 As I mentioned in my previous post, about half of our lovely harvest of butternut squash has turned into wrinkly scary-looking old squishes, just in time for Halloween. but not really a happy sight for someone who hoped to keep them in the cellar and eat them gradually throughout the winter! When I cut into them, they look OK, but it's hard to believe that they won't get progressively more wrinkly and at some point become inedible. So, I've spent the past couple of days roasting and pureeing about 10 squash.
It would be feasible to roast and puree them without adding anything to them, especially if you're thinking of adding them to recipes such as this incredibly yummy soup. But I reasoned that I'd like the flexibility of scooping some out into a bowl to eat, or adding it to a recipe, so I went ahead and prepared it for the table by adding a little unsalted butter, skim milk, and salt. It's so yummy that way. I found myself completely unable to put it all in refrigerator containers. It's like frosting ... you just have to lick the bowl, and of course you have to not scrape the bowl very clean before doing so. :o)
When you cook this many of one item, you learn to be a bit more efficient. Most recipes will tell you to cut the squash in half lengthwise, remove the strings and seeds, and roast cut-side down on a greased baking sheet or dish. I've always hated that.
 They can be hard to cut, and then there's those darn strings and seeds to get out! A long time ago, I posted a request for recommendations on how to get rid of the durn things easily. I got no responses, so I either you guys all find it really easy and don't know what I'm fussing about, or you struggle with it too and have no answer. Since then, I read a tip somewhere that said using a grapefruit knife makes it easier. It makes sense, but I haven't tried that yet.
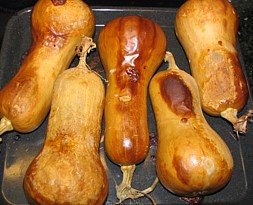
Anyway, yesterday I did the usual halve, seed, and roast bit with my squashes, cooled then a little, then scooped the flesh into the food processor. But I didn't like it that the flesh of the squashes had become brown and crusty where they touched the baking pan. So I decided to try roasting one of the squashes whole, to see how that would work. It was great! It took just a few extra minutes to roast, but the flesh was all soft, and --- best of all --- the seeds and strings were a snap to remove!
Pureed butternut squash
That's it! It's such a beautiful orange-sherbety color, and tastes so smooth and sweet. Butternut has such a wonderful, sweet, mellow flavor. It's not one of those things you have to acquire a taste for. I'd serve this to a baby and I bet it would be eaten all up! If you want to serve it to company, experiment with adding some of the classic pumpkin spices to it: nutmeg, cinnamon, allspice. But don't add too much. It's so good all by itself.Preheat the oven to 400 degrees. Put as many squashes as you'd like on a baking sheet, preferably an insulated one, or a glass baking dish. (If you don't have an insulated baking sheet, try layering two baking sheets so the heat from below doesn't totally toast the squash on one side.) Put the baking sheet or dish in the oven, on a rack in the top or near-top position.
Start testing the squash after about 35 minutes, by piercing them with a skewer in the narrow part of the squash, but not near the stem. Try to get as close as possible to the wide, seedy end as possible; I've discovered that's the part that cooks through last. You want the squash to be absolutely soft and mushy. Overcooking is better than undercooking.
When they're done, remove from the oven and allow to cool slightly. Being careful not to burn yourself, cut the squash in half crosswise at the very top of the seedy end. Then cut each of those sections in half lengthwise. This crosswise-then-lengthwise technique compensates for the softness of the cooked squash. If you cut it lengthwise and try to work with it that way, odds are the squash will collapse in half anyway, and that's much messier than cutting it.
Use a spoon to remove the seeds and strings. Be careful, because they're so soft you might be at risk for removing some of the cooked flesh, too.
Scoop the soft flesh into a food processor. Add a tablespoon or two of unsalted butter, and process till smooth, stopping once to scrape down the sides. With the processor running, add a little milk till it's the consistency you want. For a small squash, I used about two tablespoons. Also with the processor running, sprinkle salt to taste. I used a large pinch.
P.S. Tomorrow I plan to kick off a new weekly event. Please stop by to see what it will be!
P.P.S. This post qualifies for ARF 5-a-day! Hurray! Head on over to Sweetnick's for a roundup of anti-oxidant-rich foods and recipes this Tuesday night.
2 comments:
Thanks for your write up on roasting butternut squash! I tried your technique of roasting them whole, and it worked great. I left it plain, just added a bit of olive oil (since I'm on Weight Watchers) and it's awesome! Thanks :-)
this is a really great way to cook winter squash. I always had a hard time cutting those really hard shells too, plus its much easier to scoop out the seeds and pulp after the squash are cooked. Thanks for posting.
Post a Comment